For as tired and irritable as I was on day 16, day 17 found me refreshed and invigorated. Even though my framing never turns out perfectly, I still enjoy it. Throughout the entire process of building our house, framing has been the most joyous of all tasks. What begins small ends up being the skeletal, structural bones of our entire house, and it fills me with happiness to see it done.
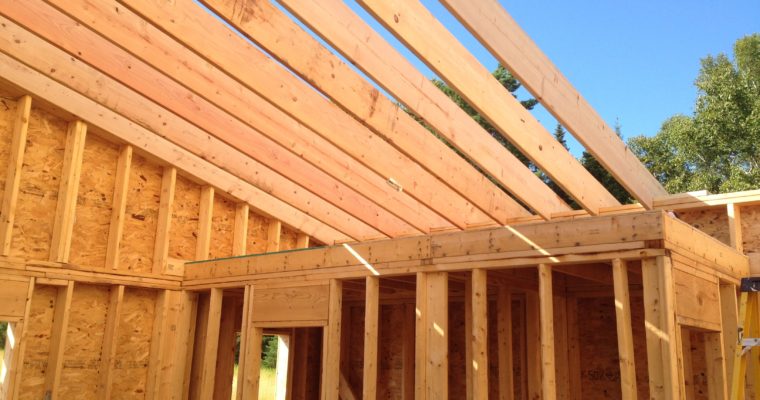
Our rafters are comprised of 2×12’s, 16 on center that span 15 feet from the South wall to the 6×12 structural beam. From there, another set of rafters span down to the North wall. Using a simple span chart, I found that these rafters would be sufficient for our required load up to a span of 18 feet. In order to set the rafters, I would have to notch out “bird’s mouths” on either end so that it would sit upon the top plate and the beam.
Luckily, this was not difficult to do. All I needed was a template. The better part day 17 was spent just getting this template figured out. From there, it’s just a matter of tracing and cutting additional rafters.
In order to get the template, I first set the whole length upon the top sill of the North wall and the beam. I left the overhang to the North as this would become my eave overhang. At the beam, I measured in a distance half of the width of the beam, and drew a line vertical on the rafter. This would be the termination of the rafter – where the two would meet.
In order to mark the bird’s mouths, I drew a vertical line up from the inside of the top plate of the North wall as well as the inside (North facing) side of the beam. These lines intersected with a point 1.5 inches from the bottom of the rafter. This would allow the rafter to sit 1.5 inches down upon the North sill and the beam.
By happenstance or just good measurement, the template fit perfectly on the first try. I slid it along from East to West to make sure that any additional rafters cut to match would also fit, regardless of their position. I did this because I was fairly certain that my North wall was not square to the beam. Again, I was lucky in that the template rafter fit perfectly, regardless of its position.

From here, I would carry a new rafter to my work space, place the template rafter on top, and simply trace out the cuts. Using my circular saw, I cut out all the required notches to match, and lifted the finished rafter into place. It’s vital to use only the template for tracing the additional rafters. If a cut is not perfectly done on a second rafter and this one is used for the template, the errors can be compounded. By the time you’re done, your 15th rafter would look nothing like the original.

In order to space the rafters, instead of measuring the 16 on centers, I simply cut a “spacer” block that was 14.5” long. This would allow me to toenail a rafter, set my spacer, and place the next rafter against it. Because my rafters are 1.5” in width, the result of half of two of them would also be 1.5”. In addition to my 14.5” spacer, the centers would be spaced at exactly 16 inches.
I used this spacer along the North wall to secure them into place, and then along the beam where I could reach it from the loft. After spending a couple of hours getting the template fashioned just right, the rest of the rafters were set in quick fashion.